| Home | | | Download | | | | | | | FAQ | | | About Me |
|
||
This is a Simple Quick HowTo on LVM setup.It's provides a quick overview of LVM setup (Logical Volume Manager) in Linux.Ready ? Let's go... Here is my hard disk details. [root@localhost ~]# fdisk -l /dev/sda Disk /dev/sda: 80.0 GB, 80026361856 bytes 255 heads, 63 sectors/track, 9729 cylinders Units = cylinders of 16065 * 512 = 8225280 bytes Device Boot Start End Blocks Id System /dev/sda1 4865 4995 1052257+ 82 Linux swap / Solaris /dev/sda3 4996 9468 35929372+ 83 Linux /dev/sda4 1 3163 25406766 5 Extended /dev/sda5 1 903 7253284+ 83 Linux /dev/sda6 * 904 1947 8385898+ 83 Linux /dev/sda7 1948 2677 5863693+ 83 Linux /dev/sda8 2678 3163 3903763+ 83 Linux Partition table entries are not in disk orderWe are going to create LVM using two partitions,  /dev/sda7 which has 5.5GB and /dev/sda7 which has 5.5GB and  /dev/sda8 which has 3.7GB space. /dev/sda8 which has 3.7GB space.
In order to Create LVM , you need to three steps Physical volume,Volume group and Logical Volume. Physical volume can be set of hard disk partitions and these partition combined together to form a Volume group. Logical volume is final resulting partition built from Volume group. Step 1: Creating Physical Volumes. The command pvcreate is used to initialize the partitions (/dev/sda7 and /dev/sda8) for use by LVM. So execute it on our partition like this, [root@localhost ~]# pvcreate /dev/sda7 /dev/sda8 Physical volume "/dev/sda7" successfully created Physical volume "/dev/sda8" successfully createdThough above output shows Physical volume successfully created on our dis, We can recheck them using the command called pvscan which scans for list of physical volumes that can support LVM setup. [root@localhost ~]# pvscan PV /dev/sda7 lvm2 [5.59 GB] PV /dev/sda8 lvm2 [3.72 GB] Total: 2 [9.31 GB] / in use: 0 [0 ] / in no VG: 2 [9.31 GB]Yeah,we are sure that two partitions are ready. Step 2: Now,Create Volume Group over Physical volumes The command to create new volume group is vgcreate - yes,you are right,it\'s very much similar to previous command pvcreate thus makes it easy to remember them. Following vgcreate command creates a new volume group called giis_vol_grp  using the block special device (/dev/sda7 and /dev/sda8) previously configured for LVM with pvcreate. using the block special device (/dev/sda7 and /dev/sda8) previously configured for LVM with pvcreate.
[root@localhost ~]# vgcreate giis_vol_grp /dev/sda7 /dev/sda8
  Volume group "giis_vol_grp" successfully created
We can display attributes of volume groups as shown below.Note the total size of giis_vol_grp volume group is sum of /dev/sda7 and /dev/sda8 ,that's 5.59GB + 3.72Gb = 9.3GB.(approx) [root@localhost ~]# vgdisplay --- Volume group --- VG Name giis_vol_grp System ID Format lvm2 Metadata Areas 2 Metadata Sequence No 1 VG Access read/write VG Status resizable MAX LV 0 Cur LV 0 Open LV 0 Max PV 0 Cur PV 2 Act PV 2 VG Size 9.31 GB PE Size 4.00 MB Total PE 2384 Alloc PE / Size 0 / 0 Free PE / Size 2384 / 9.31 GB VG UUID fC2zQj-jsNR-kH74-8JGx-mjk1-031x-2qJYKRStep 3: Finally,Create Logical Volume On Volume Group. By now you should know what lvcreate will do? right ?here it's ,lvcreate creates a new logical volume calledgiis_logical_vol  in a volume group.
Here we can specify the size of logical volume based on our requirement.We have used physical extents ( above PE size is 4MB)
to specify the size 50*4MB=200MB.You can also use --size option with lvcreate to specify the actual size.(see below simple example/demo) in a volume group.
Here we can specify the size of logical volume based on our requirement.We have used physical extents ( above PE size is 4MB)
to specify the size 50*4MB=200MB.You can also use --size option with lvcreate to specify the actual size.(see below simple example/demo)
[root@localhost ~]# lvcreate -l 50 -n giis_logical_vol giis_vol_grp
  Logical volume "giis_logical_vol" created
Now from the attributes of a logical volume,we can see it's size is set as 200MB. [root@localhost ~]# lvdisplay --- Logical volume --- LV Name /dev/giis_vol_grp/giis_logical_vol VG Name giis_vol_grp LV UUID EHuylX-oJtd-J7OT-3tP9-feDb-T24z-ozOqC8 LV Write Access read/write LV Status available # open 0 LV Size 200.00 MB Current LE 50 Segments 1 Allocation inherit Read ahead sectors 0 Block device 253:0That's it.Now we can create a file system on the logical volume.We create ext3fs for this example. Step 4:Creating File system on Logical Volume [root@localhost ~]# mkfs.ext3 /dev/giis_vol_grp/giis_logical_vol now mount it under /mnt. [root@localhost ~]# mount /dev/giis_vol_grp/giis_logical_vol /mnt/ Just check it's size. [root@localhost ~]# df -h Filesystem Size Used Avail Use% Mounted on /dev/mapper/giis_vol_grp-giis_logical_vol 194M 5.6M 179M 4% /mnt and unmount it. [root@localhost ~]# umount /mnt/LVM Usage -Simple Example/Demo 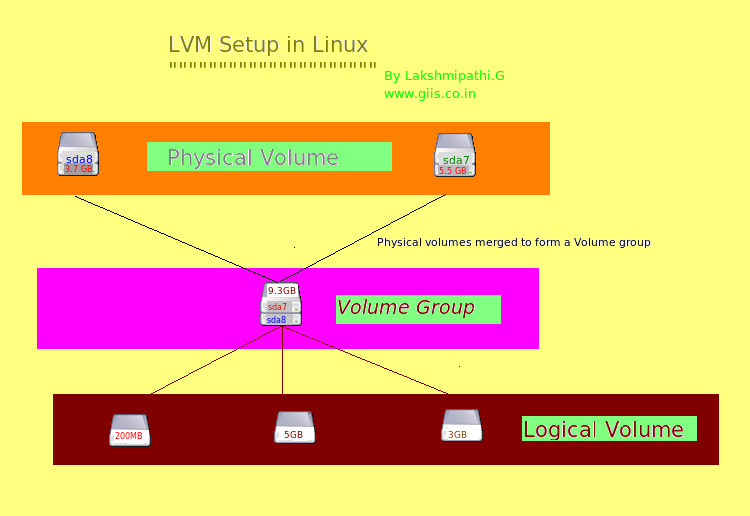 Say for example,Now I have created two logical volumes named "bkup_sys" with 5GB  and "main_sys" with 3GB
  and formatted it as ext3fs and mounted them.
[root@localhost ~]# lvcreate --name bkup_sys --size 5G giis_vol_grp
  Logical volume "bkup_sys" created


[root@localhost ~]# mkfs.ext3 /dev/giis_vol_grp/bkup_sys


[root@localhost ~]# df -h
Filesystem           			   Size  Used Avail Use% Mounted on
/dev/mapper/giis_vol_grp-bkup_sys
                      5.0G  139M  4.6G   3% /mnt


[root@localhost ~]# lvcreate --name main_sys --size 3G giis_vol_grp
  Logical volume "main_sys" created


 mkfs.ext3 /dev/giis_vol_grp/main_sys
Now both are mounted,using df command we get following output,
[root@localhost ~]# df -h


/dev/mapper/giis_vol_grp-main_sys
                      3.0G   69M  2.8G   3% /mnt/main_sys
/dev/mapper/giis_vol_grp-bkup_sys
                      5.0G  139M  4.6G   3% /mnt/bkup_sys
Few months later,we found, bkup_sys doesn't need 5GB and 4GB is enough.
And main_sys needs extra 1GB.Following represents the currents status of LVM
[root@localhost ~]# lvscan
  ACTIVE            '/dev/giis_vol_grp/giis_logical_vol' [200.00 MB] inherit
  ACTIVE            '/dev/giis_vol_grp/bkup_sys' [5.00 GB] inherit
  ACTIVE            '/dev/giis_vol_grp/main_sys' [3.00 GB] inherit
Shrinking size So first we reduce/shrink "bkup_sys" from 5GB to 4GB using lvreduce command. [root@localhost ~]# umount /mnt/bkup_sys/ [root@localhost ~]# lvreduce -L 4G /dev/giis_vol_grp/bkup_sys WARNING: Reducing active and open logical volume to 4.00 GB THIS MAY DESTROY YOUR DATA (filesystem etc.) Do you really want to reduce bkup_sys? [y/n]: y Reducing logical volume bkup_sys to 4.00 GB Logical volume bkup_sys successfully resizedAs you can see from above ,the "bkup_sys" is shrinked to 4GB. Use lvscan to verify it. [root@localhost ~]# lvscan ACTIVE '/dev/giis_vol_grp/giis_logical_vol' [200.00 MB] inherit ACTIVE '/dev/giis_vol_grp/bkup_sys' [4.00 GB] inherit ACTIVE '/dev/giis_vol_grp/main_sys' [3.00 GB] inheritIncreasing size Now we increase the "main_sys" to 4GB using lvresize command. [root@localhost ~]# lvresize -L 4G /dev/giis_vol_grp/main_sys Extending logical volume main_sys to 4.00 GB Logical volume main_sys successfully resizedFinally we got the required size,where "main_sys" is increased from 3GB to 4GB and "bkup_sys" size reduced from 5GB to 4GB. [root@localhost ~]# lvscan ACTIVE '/dev/giis_vol_grp/giis_logical_vol' [200.00 MB] inherit ACTIVE '/dev/giis_vol_grp/bkup_sys' [4.00 GB] inherit ACTIVE '/dev/giis_vol_grp/main_sys' [4.00 GB] inherit |
||
Open Source Programmers